Summary: Have trouble of importing your Tivo videos into Final Cut Pro X? Don't worry, this article mainly shows you how to import and edit Tivo files in FCP X on Mac (EI Capitan Included).
Final Cut Pro X is the ultimate MAC video editor, which has gained the favor of many professional users including Hollywood films makers. Nowadays, on the internet there are many users looking for the best way to edit different video formats with Final Cut Pro X/6/7. Chances are you have some Tivo recordings and wanna load those Tivo fiels to FCP X for making some modifications before sharing with others, only to find Tivo files can not be imported to Final Cut Pro X directly. If you are stucking in such above issues, just read on the article and your hassles will be fixed!
Well, after the widely Google searching, we figured out the workaround for you. In fact, FCP X does not accept TiVo video recordings, so, if you want to edit TiVo videos in your FCP X/7/6, you need to change TiVo recordings to a FCP compatible format in advance. Here, Apple ProRes is highly recommended. It will ensure the maxmium editing quality and efficiency when working TiVo with FCP.
In order to do such a conversion, you are highly recommended to use a professional Video Converter for Mac to be your assistant. It's not easy taking all the noteworthy products on the internet and narrowing them down to a list of high-quality Mac converters. But there is still one great app - Brorsoft Video Converter for Mac which winds up on the cutting room floor. With it, you can easily rewrap TV shows .tivo to ProRes 422, ProRes 422 HQ or 4444 for using in Final Cut Pro X/7/6. It also provides simple video editing functions for you. Besides, the Mac video converter can convert other common videos like AVI, MKV, VOB; HD videos(MTS, MOV, MXF) from HD camcorders or DVs for editing in Final Cut Pro, Final Cut Express, iMovie, Avid MC, Adobe Premiere Pro, etc. Just download it and follow the tutorial below to convert TiVo to ProRes for FCP.
Convert TiVo shows to Final Cut Pro edit-friendly format
Step 1. Add TiVo files
Launch the TiVo to Final Cut Pro Converter; click “Add” button from main menu to browse your computer hard drive and select the TiVo files you want to convert. Or you can easily drag-and-drop files into this application for converting.
Note: Before adding TiVo shows to the video program for converting, you need to click the “Option” button. Switch to “TiVo” tab in Option window, and enter TiVo Media Access Key first.
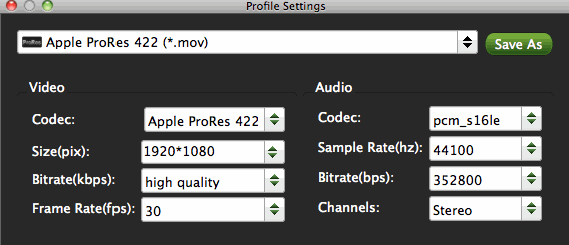
Step 2. Choose ProRes as the output format
Click the Format bar to get the drop-down menu and you can get the Apple ProRes codecs, including ProRes 422 (HQ), ProRes 422, ProRes 422 (LT), ProRes 422 (Proxy) and ProRes 4444. Choose the proper one you want. By clicking Settings icon, you can fix the frame rate, bitrate, sample rate, audio channel to your needs.
Step 3. Start TiVo to ProRes conversion
Hit “Convert” button to start encoding TiVo files to ProRes MOV for Final Cut Pro X or FCP 6/7 under Mac OS X. Once the TiVo to ProRes 422 conversion is done, you can transfer your TiVo recordings into Final Cut Pro for editing smoothly on Mac with ease.
Additional Tips:
Step 1. Before working with TiVo files on Mac OS X, you need to first transfer TiVo video to your Mac. The best way is to download the free TiVo Desktop software for Mac and transfer Tivo TV shows and movies to Mac.
Step 2. By clicking the Edit icon, you can trim, crop, add watermark, insert subtitles to your source video.
Friday, October 30, 2015
Wednesday, October 28, 2015
Importing DJI Phantom 3 4K to Final Cut Pro for further editing
The DJI Phantom 3 camera can shoot up to 4K videos with MPEG-4 AVC/H.264 format and capture 12 megapixel photos that look crisper and cleaner than ever. A live HD view lets you truly experience flight and see everything from your camera in real time. After recording, many people may also wanna do some operations on their 4K recoreded footages in NLEs like Final Cut Pro. While the problem is, according to my testing, the 4K video was restricted to editing in FCP X, which can’t handle 4K videos well.
Frankly speaking, expect for Final Cut Pro, most popular editing softwares including iMovie, Avid Media composer, Premiere Pro and more all can't support 4K video natively due to the codec incompatibility. In addition, the 4K video footage compressed with MPEG-4 AVC/H.264 will still have big file size, it will take a lot of time for Final Cut Pro to render those 4K videos. So we have to say we need some other third-party tools to resize the 4K files to 1080p on Mac there. If you actually wanna edit the DJI Phantom 3 4K footages in Final Cut Pro, the recommended suggestion is to transcode DJI Phantom 3 Professional 4K video to Final Cut Pro best editing codec - Apple Prores 422 codec (1080p would be the best settings.), a post-production format designed for pristine quality and high-performance Final Cut Pro real-time editing.
To achieve the goal, a professional 4K Video Converter is what you need. Featured with the most advanced converting technology, Brorsoft 4K Video Converter for Mac is the optimal choice for you. It provides hundreds of output format presets for 4K videos, such as Apple ProRes for Final Cut Pro as well as DNxHD for Avid, MPEG-2 for Adobe Premiere, Apple InterMediate Codec for iMovie, etc. Besides, this 4K converter is also available to customize the output resolutions to any size like 1080p, 2K, 4K as users want. Download the tool and start the 4K video conversion.
Convert DJI Phantom 3 4K to FCP for editing
Step 1. Add video files to the software
Run the program you just set up. Drag and drop the 4K files to the Converter. You can also hit Add files button to import videos to the app. If you want to join the imported clips into one for easy editing, please tick the box "Merge into one" on the main interface.
Step 2. Choose output format
Click "Format" bar and choose Final Cut Pro> Apple PreRes 422(*.mov) as output format for editing raw 4K in Adobe with natively supported video codec.
Step 3. Video/Audio settigs
If you'd like to customize advanced audio and video parameters like Video Codec, aspect ratio, bit rate, frame rate, Audio codec, sample rate, audio channels, please turn to "Settings" page. Usually 1080p is the optimal setting for using in Final Cut Pro. You can downscale DJI Phantom 3 4K to 1080p.
Step 4. Start conversion
Hit the convert button; it will start converting DJI Phantom 3 4K for importing to Final Cut Pro. Soon after the conversion, just click "Open" button to get the generated files for editing in FCP perfectly.
Monday, October 26, 2015
How to Convert MKV to Edit in Final Cut Pro
"Hi Just purchased Final Cut Pro X and I'm really impressed with it so far. However, I have just discovered that it cannot import MKV files. My question is - What is the best method of doing this while still retaining the quality of the footage? I have look at various convertors but tricky to choose which one top go for? Any advice would be greatly appreciated. Thanks"
There are a lot of users have encountered problems when they want to import MKV to Final Cut Pro on Mac, just like the problem showed above, what’s the best way to import and edit MKV files with FCP? how to solve MKV to FCP importing and editing issue? Many users are talking about these questions on final cut pro related forums, now in this article we will share the best way with you to import MKV to FCP and edit natively.
As all we know, Final Cut Pro is a wonderful tool to help us turn our home videos into professional eye-catching movies. But it normally can recognize a few file formats like DV, MOV, M4V, MP4 and some AVI files from cams. While MKV is not supported. In order to import MKV files to Final Cut Pro for editing, you'll need to convert MKV to FCP compatible video format. Since ProRes is the the most compatible codec introduced by Apple which ensures maximum editing quality and efficiency when working with Final Cut Pro, the quick workaround is to convert MKV to Apple ProRes codec MOV format for soomthly importing and editing with FCP X on Mac.
The process to convert the files to ProRes is fairly easy and fast as long as you have such a tool like Brorsoft Video Converter for Mac, which is especially designed for Mac users to encode MKV video to Apple ProRes with best output quality. Overall, the program is a professional yet all-in-one video conversion tool. With it, you can easily convert all MKV files to ProRes 422, ProRes 422 HQ or 4444 for using in Final Cut Pro X/7/6. It also provides simple video editing functions for you. Besides, the Mac video converter can also convert HD videos from HD camcorders or DVs (like JVC, Panasonic, Sony and Cannon) for editing in Final Cut Pro, Final Cut Express, iMovie, Avid MC, Adobe Premiere Pro etc. Just download it and follow the tutorial below to convert MKV to Apple ProRes for FCP X/7/6.
How to Convert MKV for Editing in Final Cut Pro
STEP 1: Launch the Mac MKV to FCP Converter; click "Add" button from main menu to browse your computer hard drive and select the MKV files you want to convert. Or you can easily drag-and-drop files into this application for converting. You can also load video files formatted in .avi, .wmv, .flv, .vob, .mpg, etc.
STEP 2: Click the format bar, and move mouse cursor to "Final Cut Pro > Apple ProRes 422 (*.mov)" as output format.
Tips: In case the default settings do not fit your requirement, you can click "Settings" button and enter "Profile Settings" panel to adjust video size, bit rate, frame rate, sample rate and audio channels.
STEP 3: Click Convert button to start transcoding MKV to ProRes for Final Cut Pro on Mac OS X.
Once the conversion completes, you can click "Open" to find the .MOV videos which can be directly imported to FCP 6/7/X. You've done.
Saturday, October 24, 2015
Converting MXF to Apple ProRes on Mac OS X El Capitan
Summary: The guide shows you how to convert MXF to Apple ProRes on Mac OS X EI Capitan, so that you can soomthly edit MXF clips in Final Cut Pro.
MXF, which is the abbreviation of Material exchange Format. It is an open file format, targeted at the interchange of audio-visual material with associated data and metadata. People who are fond of shooting videos by Panasonic P2 camcorders, Canon XF series camcorders, will find that the recorded video format usually in .mxf format. Unfortunatly, the MXF standard simply has not yet been adopted by Apple, Adobe or any of the other of the software industry leaders. So if you got some MXF files, how to import MXF to Final Cut Pro? Follow this guide and go on your movie director experience.
Maybe you are looking for a MXF to Final Cut Pro importing plugin, but it s not easy to find a good plugin that works for lastest cameras and camcorders, since there are many kinds of codecs used by these recording devices, you'd better find a way to import MXF to Final Cut Pro without plugins. After searching in FCP official product page, we will know that the native supported format of FCP is Apple ProRes codec MOV format, so the best option to import MXF clips to FCP for editing is to convert MXF to FCP Apple ProRes codec, and then you can edit the videos with FCP smoothly, which means you need some professional MXF to FCP converter to help you realize the video importing process.
Brorsoft MXF Converter for Mac is exactly the MXF to FCP converting software you need. This professional MXF video converting software supports most MXF videos created by popular camcorders. Also it can convert these MXF files to the most suitable Apple ProRes 422 with outstanding output video quality and perfect audio and video synchronization. Better still, it also offers the optimal profiles for Avid Media Composer, Premiere Pro, iMovie and more. Download the program to start the MXF to Apple ProRes 422 MOV conversion task.
Detailed guide on how to convert MXF to ProRes MOV on Mac OS X EI Capitan
Step 1. Load MXF files to the program
Install the program on Mac and run it. Drag the MXF files to the software. Or you can also click "Add" button on the top of the main interface to import video to the program.
Step 2. Choose ProRes MOV as output format for MXF to FCP conversion.
Brorsoft MTS Converter Mac offers optimized format presets for Final Cut Pro, “Final Cut Pro -> Apple ProRes 422 (*.mov)”, “Final Cut Pro -> Apple ProRes 422 HQ (*.mov)”, etc. Choose a one you need.
Tips:
If the default settings do not fit your needs, you can click “Settings” button to adjust audio and video parameters as you like.
Step 3. Convert MXF to ProRes MOV for importing to Final Cut Pro.
Click “Convert” button and the selected MXF files will be converted to Apple ProRes encode mov files. You may check the converting progress and set auto shutdown in the conversion window. After conversion, click “Open” folder to find converted footage for importing to Final Cut Pro 6/7/X.
Thursday, October 22, 2015
How to convert MTS to MOV on Mac OS X 10.11 El Capitan
Summary: This is an instructive guide on how to effortlessly convert MTS to MOV on Mac OS X EI Capitan, so that you can freely watch, edit and stream your recorded MTS videos on Mac computer.
MTS is a high-definition transport stream video file format and the reason why MTS is so popular lies in that video in .mts video format is definitely high quality. People, who have HD cameras like Panasonic Lumix DMC Series, Canon HG10, Sony Alpha NEX series, etc, record their important events such as commencement, wedding, baby birthday and save the recorded videos into .mts or .m2ts.
However, if you also eager to import those cam files to your QuickTime/iTunes for playback or Final Cut Pro/iMovie for editing, you will definitely have to face the roadblock when handling those recorded files on Mac OS X EI Capitan since those clips are not compatible with most popular Apple players and portable devices.
After you know why can't play MTS files smoothly on the above players or devices, you must be wondering how to solve the issue. In fact, a widely used solution is to convert MTS to MOV, a more popular format with Apple players and devices. To finish MTS to MOV conversion on Mac easily, owning a professional HD video converter for Mac is the top priority. Brorsoft Video Converter for Mac is worth a shot since it has the ability to convert MTS to MOV to play MTS files freely on iTunes, iPhone, iPod, iPad, QuickTime, Apple TV or edit MTS/M2TS files in iMovie or FCP on Mac OS X Capitan. Besides converting MTS to MOV, it enables to convert MTS to many other popular video formats like WMV, FLV, AVI, MP4, MKV, VOB and more. Here we go to find how it works.
How to transcode MTS files to MOV on Mac
Step 1: Add MTS files to the software > Launch the MTS to MOV Converter Mac and drag and drop the source media to it. Or click "Add" button to locate the MTS files you want to convert.
Step 2: Choose MOV as output format > Click Format to choose "Common Video -> MOV - QuickTime (*.mov)" profile in the drop-down menu.
Trick: If you want to convert MTS to MOV for Final Cut Pro, iMovie, you are recommended to directly choose "Final Cut Pro > Apple ProRes 422(*mov)" for FCP; "iMovie and Final Cut Express > Apple InterMediate Codec(AIC)(*mov)" for iMovie, FCE.
Step 3: Start converting MTS to MOV on Mac > Finally, click the Convert button to start converting your MTS videos to MOV on Mac.
Once the conversion finished, tap the Open button to get high quality resulted MOV videos. After that, you can play the video files with QuickTime, iTunes or edit them in Final Cut Pro, iMovie FCE, etc. to meet your different needs on Mac OS X.
Tuesday, October 20, 2015
Simple Way to Import Samsung NX1 4K H.265 Videos to Final Cut Pro
Summary: Are you trouble of transferring Samsung 4K H.265 footages into Final Cut Pro for editing? Don't worry, this passage aims to teach you how to soomthly edit Samsung NX1 H.265 files in Final Cut Pro.
The Samsung NX1 is a new professional compact system camera. One of the key features is its 4K video recording capability and adopting a new codec H.265 (HEVC) for its 4K recordings, which has the capable of recording videos with higher quality while smaller size. So today more and more people are fond of uploading H.265 videos to YouTube/Vimeo for sharing. However, if you get some 4K H.265 footages recorded from Samsung NX1 camera, and wanna need to make some modifications to those shooting videos with Final Cut Pro, then you will definitely encounter some or other issues like FCP can't read H.265 files.
That's because Samsung NX1 recorded H.265/HEVC footages have not yet been accepted by most NLEs including Final Cut Pro. for this case, you'll need to convert the NX1's H.265(HEVC)video files to something usable for Final Cut Pro like Apple ProRes. PC and Mac users can use Samsungs included Movie Converter, but it's pretty slow. It took us three hours to convert 13GB of 4K video, for example. Handbrake does a decent job of transcoding, but the Mac version won't do more than one file at a time- a cumbersome process to say the least. What we need is a more professional H.265 converter for Mac. Here Brorsoft H.265 Converter for Mac is highly recommended.
This professional Mac H.265 converter is the solid tool to help users convert the Samsung NX1 4K H.265 to ProRes for FCP on Mac OS X(EI Capitan Included) without quality loss. It also offers the optimal profiles for Avid Media Composer, Adobe Premiere Pro, iMovie and more. Download the program to start the H.265 to ProRes conversion task.
How to Transcode Samsung NX1 H.265 video to FCP X/7/6
Step 1. Add 4K H.265 videos
Install and run the best H.265 to ProRes converter and transfer your 4K H.265 recordings from Samsung NX1 to the program.
Step 2. Choose output format
Click "Format" bar and choose "Final Cut Pro >> Apple ProRes 422 (*.mov)" as output format for editing H.265 in FCP with natively supported video codec.
Tip -Profile Settings:
In case the default settings do not fit your requirement, you can click "Settings" button and enter "Profile Settings" panel to adjust video size, bit rate, frame rate, sample rate and audio channels. This H.265 converter app can maintain original 4K resolution for you if you need or downscale 4K to 1080p.
Step 3. Start converting H.265 video to FCP
Hit the convert button, it will start converting Samsung NX1 H.265 to ProRes .mov for importing to Final Cut Pro 6/7 and FCP X immediately. Soon after the conversion, just click "Open" button to get the generated files for natively editing in Final Cut Pro perfectly.
Sunday, October 18, 2015
Converting MXF to Apple ProRes on Mac OS X El Capitan
Summary: This guide mainly shows you how to transcode and convert MXF files to ProRes 422 so that you can freely edit your MXF footages in FCP 6/7/X in Mac (EI Capitan Included).
MXF is a format adopted by some professional camcorders, like Canon C300, Canon XF100, Canon XF300, Panasonic P2 HVX200 or Sony XDCAM PDW-F800. Chances are you have recorded some MXF videos from above camcorders and also wanna import those MXF footages into Final Cut Pro for editing before uploading to YouTube or posting on Facebook. You will definitely get into troubles due to the MXF format is not compatible with most popular video editing applications including the Final Cut Pro on Mac.
To solve this problem, you need to transcode MXF to some specific format (ProRes 422) supported by FCP. Apple ProRes 422 a lossy video compression format intended for use during video editing. This format retains relatively high video quality. After transcoding MXF to ProRes codec, you can import any MXF clips to FCP 6/7/X easily, besides, you don't need to render the footages. To do the MXF to ProRes task, here Brorsoft MXF video Converter for Mac is highly recommended to you. It's compatible with any Mac OS system including the latest OX S EI Capitan.
With it you can rewrap MXF footages recorded from Canon, Panasonc or Sony cameras to Apple ProRes 422, Apple ProRes 422(HQ), Apple ProRes(LT), Apple ProRes(Proxy), Apple ProRes 4444 to fulfill your different quality needs when using in Final Cut Pro 7/6/X. If you're editing MXF files with Final Cut Pro, Premiere Pro CC/CS6, Final Cut Express, Avid Media Composer or iMovie, chances are you already installed this great utility. If not, download it now and learn the step-by-step MXF to ProRes conversion.
Guide on Converting MXF to ProRes 422
Step 1:Add MXF files.
Install and launch the Mac MXF to ProRes converter, and then click "Add Video" button to locate and import MXF files. Note that you need to transfer MXF files from your MXF video to Mac Hard Drive before conversion and you can find the MXF video from one MXF whole structure folder.
Step 2: Select output format for FCP
Click on the "Format" bar and get the dropdown menu, then move your pointer to choose "Final Cut Pro> Apple PreRes 422" or "Apple ProRes 422 HQ" or "Apple ProRes 4444" as the output format.
Tips: If you want to set some parameters for the output profile, you could click the "Settings" button to set the output bitrate, encode, frame rate, resolution, sample rate, channels, etc.
Step 3: Start the MXF to ProRes MOV conversion on Mac
Click Convert button to start converting MXF to ProRes .mov for Final Cut Pro on Mac OS X.
Once the conversion completes, you can click "Open" to find the .MOV videos which can be directly imported to FCP. As you see, now you can import and edit MXF clips in Final Cut Pro 6/7/X without problems.
Additional Tips:
If you want to edit MXF media in Adobe Premiere Pro, please choose the " Adobe Premiere/Sony Vegas --> MPEG-2(*.mpg) " as output; For iMovie or FCE 4, choose the "iMovie and Final Cut Express -> Apple InterMediate Codec (AIC) (*.mov)". For Avid MC, choose "Avid Media Composer
Thursday, October 15, 2015
How to Import Zenmuse X5/X5R 4K Videos to Final Cut Pro
Summary: This folowing guide aims to teach you how to transfer Zenmuse X5/X5R 4K video to Final Cut Pro for the purpose of creating remarking editing work.
With the announcement of Zenmuse X5 and X5R, two new MFT cameras designed for drones, DJI has made a significant boost in their offer aimed at professional aerial filmmakers. X5 as the ‘world’s first mirrorless, compact Micro Four Thirds camera made specifically for aerial photography and cinematography’ and X5R ‘the world’s first Micro Four Thirds aerial camera capable of recording lossless 4K videos in RAW.
After recording 4K video footage with the two aerial cameras, you may wish to polish the video with some NLE editing program such as Final Cut Pro on Mac. Although Final Cut Pro has official claimed its powerful processing capability of 4K video, it still be tricky when working 4K files with Final Cut Pro due to its high compressed nature and you may encounter video disordered, picture stunning and some other problems. For this case, the recommended suggestion is to transcode Zenmuse X5/X5R 4K video to Apple Prores codec, which is specially designed for high quality and high performance editing in Final Cut Pro.
The process is surprisingly easy and can be done with the help of Brorsoft 4K Video Converter for Mac. The program lets you convert Zenmuse X5 X5R 4k video to Apple ProRes encoded MOV, which ensures maximum editing quality and efficiency when importing videos to Final Cut Pro (no matter Final Cut Pro 6, Final Cut Pro 7 or Final Cut Pro X) on Mac(EI Capitan Included) in a few clicks.
Besides that, you can also utilize the program to do some basic editing functions for you such as video trimming, cropping, applying special effects, adding watermark as you like. Below is a brief how to.
How to transcode Zenmuse X5/X5R 4K video to FCP Mac OS X El Capitan?
Step 1: Add Zenmuse X5/X5R 4K video files.
Click the "Add Video" button or "Add from folder" button to import source Zenmuse X5/X5R 4K video files to the program. You can add multiple video clips at one time.
Step 2: Choose output file format.
Click the "Format" bar and select "Final Cut Pro" > "Apple Prores 422 (*.mov)" as output format. If your Mac is a little old or slow, you can choose to select "Apple Prores 422 (LT) (*.mov)" or "Apple Prores 422 (Proxy)" to save your bandwidth, if your computer is fast enough or you wish to do some high performance editing work, "Apple Prores 422 (HQ) (*.mov)" or "Apple Prores 422 (*.mov)" is more preferable.
Step 3 (optional): Adjust the video, audio settings
Click "Settings" to fix the frame rate, bitrate, video size, etc to your needs. If you want to edit in Final Cut Pro without having to render the clips while editing, all the frame sizes must be the same as the sequence settings.
Step 4. Convert Zenmuse X5/X5R 4K to Apple Prores.
Click the "Convert" icon under the preview window, it will start to convert Zenmuse X5/X5R 4K video to FCP supported Apple Prores format.
After the conversion, launch Final Cut Pro, choose File > Import > Files..., locate and find the folder where you save the converted video clips. Then start Zenmuse X5/X5R 4K video to FCP professional post workflow with no difficulty.
Tuesday, October 13, 2015
Converting AVCHD files for Final Cut Pro 7
"Lately, i have purchased Canon HG10 camera, its shooting quality is amazing and then i wanna edit those wonderful footages with Final Cut Pro 7 for making my own private collection, but only to find that the Final Cut Pro 7 can't accept my Canon AVCHD footages, is there any way to help me convert AVCHD footages into Final Cut Pro 7 successfully, thanks in advanced."
Cameras from Canon, Panasnoic and Sony shoot footages in AVCHD, for example, Canon HG10, Panasonic Lumix DMC Series, Sony HDR-SR10E. The recorded video from above cameras, AVCHD, is highly compressed using a codec based on the MPEG-4 AVC/H.264 standard, making it quite tough to work with most editng softwares including Final Cut Pro 7 (even the lastest version Final Cut Pro X). Then, how to get Final Cut Pro 7 working perfectly with AVCHD MTS footage? A best way is to convert AVCHD MTS files to ProRes .mov, something ensuring maximum editing quality and efficiency when working with FCP.
If you want to fast convert AVCHD files to Final Cut Pro 7 while kepping the excellent video quality, here i recommend you adopt the Brorsoft MTS Converter for Mac(EI Capitan Included). It is intuitive, clean and safe to install and use. With it, you can effortlessly transcode AVCHD MTS to Apple ProRes 422, ProRes 422 HD, ProRes 422 LT, ProRes 4444 for FCP 6/7/X, and it works well and converts flawlessly. The versatile AVCHD MTS Converter Mac is not only designed for converting MTS files for Final Cut Pro. It is also professional in making AVCHD files editable in Adobe Premiere Pro, FCE, Avid Media Composer, iMovie, etc to meet your different needs. Below is how.
How to soomthly transfer AVCHD to Final Cut Pro 7 for editng?
Step 1. Add AVCHD MTS footage to the AVCHD MTS to FCP Converter.
Once you run it, click “Add Video” button or “Add from folder” button to load your source AVCHD MTS files. When the AVCHD MTS files are loaded to the MTS to FCP Converter, you can view the videos from the Preview window. Simply select an item and click the “Play” button. When the video is playing, you are allowed to take snapshoot.
Step 2. Choose ProRes MOV as output format for MTS to FCP conversion.
Brorsoft MTS Converter Mac offers optimized format presets for Final Cut Pro, “Final Cut Pro -> Apple ProRes 422 (*.mov)”, “Final Cut Pro -> Apple ProRes 422 HQ (*.mov)”, etc. Choose a one you need.
Tips: If the default settings do not fit your needs, you can click “Settings” button to adjust audio and video parameters as you like.
Step 3. Convert AVCHD MTS to ProRes MOV for importing to Final Cut Pro.
Click “Convert” button and the selected AVCHD MTS files will be converted to Apple ProRes encode mov files. You may check the converting progress and set auto shutdown in the conversion window. After conversion, click “Open” folder to find converted footage for importing to Final Cut Pro 6/7/X.
Saturday, October 10, 2015
Best Way to Use Bandicam Videos in Final Cut Pro
Summary: Are you trouble of importing and opening Bandicam videos in Final Cut Pro? If so, just follow the simple and easy tutorial to figure out hor to fix this problem effortlessly.
For some people who usually need to record a certain area or full-screen game videos in PC, this Bandicam Recoring software will be a good choice. The install space is small but the output quality is very sharp and the recorded videos are usually saved as AVI or WMV video format. In some occassions, you may also wanna edit those Bandicam videos on Mac with Final Cut Pro before uploading to YouTube or sharing with Twitter. However, you may disappointed to find that the Mac tool return some error meassages showing the file or folder is not suitable for import. Well, how to import Bandicam videos into Final Cut Pro sucessfully? Read on this article, you will get the hints.
Monday, October 5, 2015
How to Bring Blu-ray Video to Final Cut Pro X
Want to edit your Blu-ray movies in Final Cut Pro but only to find that you can't import Blu-ray to Final Cut Pro? Check out how to solve the problem here!
Recently, i have purchased some interesting Blu-ray movies and then i attempted to put some clips of the Blu-ray discs in Final Cut Pro X with my recordings. Unfortunately, some problems happened when I trying to import a Blu-ray disc (Fast & Furious 7) to Final Cut pro X, I got a File Import Failure window that says “Unsupported format or damaged file.” After serching further and widely, i realized the problem is that I am trying to pull files from a store-bought Blu-ray disc into Final Cut Pro which has some kind of copy protection. Yes, that is the definite cause of the problem. Final Cut Pro X can’t support Blu-ray disc which has protection at all. So, the optional choice is that I need to decrypt the protection of Blu-ray disc first and then import to Fianl Cut Pro X.
One of my friends recommends Brorsoft Blu-ray Ripper for Mac (EI Capitan included). The software is ease of use. I download the trail version and convert my Blu-ray movie to a Final Cut Pro highly compatible format ProRes MOV. So, I can import it freely on Final Cut Pro X. In fact, it can just copy the movie content under the profile of “Directly Copy” which highly reduces the conversion time. The most important is that the conversion quality was great! The quality of the conversion was beyond expectation- the files looks as good as from the original. Very clean, very quick, very impressive.
This converter not only supports Final Cut Pro X, but also suits other models of Final Cut Pro, including FCP 6, FCP 7 and Final Cut Express. Anyone who has the similar issues can follow the tutorial below presenting the Blu-ray to ProRes 422 (*.mov) conversion process. I do the conversion on Mac Maverick (it also supports Mac OS X EI Capitan and Windows OS including ).
How to convert Blu-ray to ProRes 422 for Final Cut Pro on Mac
Step 1. Load Blu-ray movies
Insert the Blu-ray disc you want to convert into your BD drive and click "Load Blu-ray" icon to import the Blu-ray movies. Loaded Blu-ray movies can be previewed in the right preview window and you're free to take snapshots of your favorite Blu-ray movies. In addition, you can select the subtitle and audio track as you like.
Step 2: Select output format
Set the right output format from the drop down profile list, here choose "Final Cut Pro > Apple ProRes 422 (*.mov)" as output format.
Tip: You can click on “Settings” button to adjust audio and video parameters. Bit rate, aspect ratio, frame rate, sample rate, and channels are all changeable in the following interface, so you can adjust them according to your own requirements.
Step 3: Start to rip Blu-ray movies to ProRes
After all press "Convert" button to start the Blu-ray to Apple ProRes 422 conversion for FCP under Mac OS X. After the conversion, import the ripped video files to your FCP and edit them with ease.
Friday, October 2, 2015
Work Sony XDCAM PXW-X180 XAVC/MXF into Final Cut Pro 6/7/X
Summary: This below simple guide will explains you how to import Sony PXW-X180 XAVC to Final Cut Pro X/7/6 without rendering or other hassles on Mac OS X(EI Capitan included).
The Sony PXW-X180, as the newest addition to the Sony XDCAM Series, offering high quality content creation in the HD domain. In addition to XAVC, MPEG HD 422, MPEG HD 420, AVCHD and DV are also supported, making it ideal for a wide range of applications from education/videography to news and broadcast production. However, if we want to import the XAVC videos from Sony PXW-X180 to FCP X/7/6 for editing, you may find the high quality XAVC files are not recognized by FCP. So how can we sucessfully import XAVC footage recorded from [url-=http://www.brorsoft.com/how-to/import-sony-pxw-x180-xavc-to-fcp-avid-premiere.html]Sony PXW-X180 to Final Cut Pro[/url] for editig? Read on this article, you will get the hints.
The basic reason why we can't work XVAC videos in Final Cut Pro smoothly is that XAVC codec is a new one, and is not widely supported. In order to make the XAVC videos from Sony PXW-X180 compatible with FCP X/7/6, a available way is to convert Sony PXW-X180 XAVC to Final Cut Pro compatible format like Apple ProRes MOV. Brorsoft Video Converter for Mac is the solid tool to help users make the XAVC transcoding under Mac OS X(EI Capitan included).
Applying it, you are capable of converting XAVC to Apple ProRes format with lossless quality at faster speed so that you can edit Sony PXW-X180 XAVC in FCP X/7/6 without any problem. Besides, the program is developed with some useful editing features, including merging several clips into one for easy importing,downsizing the files for editing and storage, triming your video or extracting your favorite scene, adding subtitles, replacing original audio tracks, etc. Just download it and follow the tutorial below to get the work done.
Editor's Note: If you're using FCP 7 or FCP 6, you may have to transcode the XAVC files. If you you're using Final Cut Pro X, you get Sony XAVC/XDCAM Plug-in for Final Cut Pro X to have a try. This this Sony Camera Import Plug-in that provides support for XDCAM / XDCAM EX / XAVC files shot on Sony SxS card, allowing viewing and editing capability in Final Cut Pro X. This is the latest plugin for FCP X, added support for XAVC (4K & HD) files. The plugin is free but you will usually encounter rendering or crashing problems. So the best bet is to convert the XAVC to ProRes with the following steps.
How to Convert PXW-X180 XAVC to ProRes for FCP
Step 1. Launch the Sony XAVC Converter for Mac and click add button to import XAVC clips to the program for converting.
Step 2. Click on the "Format" bar and choose a best editable format. Select Final Cut Pro > Apple ProRes 422 (*.mov) as the output format for Final Cut Pro.
Step 3. Hit the Convert button to start the conversion; it will transcode Sony XAVC to Final Cut Pro friendly format on Mac OS X.
After the conversion, you can get the converted Sony PXW-X180 videos for editing with Final Cut Pro X or FCP 7/6 smoothly
Subscribe to:
Posts (Atom)